

I’m working hard on my loki commission and noticed that one of the hems was especially weird. Luckily for me the internet has a solution to everything, and here’s a fantastic tutorial you should look at, especially if you’re making a vest!
Also found a great PDF if you want ideas for how to finish off the bottom of skirts that isn’t just roll hemming:
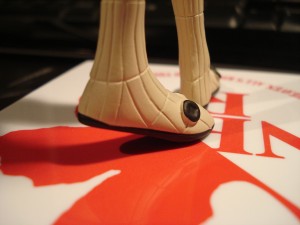
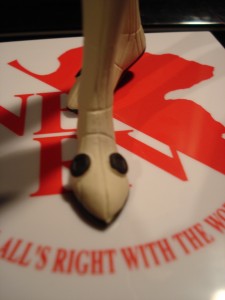
So, I made a plug suit. A plug suit which has shoes that look like this:


Joy.
I decided I wanted to sew all the seams, which did look awesome and I don’t regret doing, but I sure as hell hated myself while I was doing it.
Image heavy tutorial under the cut!
I hate gloves. Every costume maker does, they’re fiddily and a bad fitting glove will show up far more than a bad fitting jacket will.
Here’s how I make lycra gloves, with a helping hand from my friend- freezer paper!
Yet more boring stuff that no one cares about reading- the meticulous pre-planning behind a costume.
I’m currently making a plug suit for a client, which looks like this:
She lent me the model for reference which is wonderful, nothing better than a mini 3D version of what you want to make.
The client provided me with a duct tape dummy which is vital to making a costume like this. They made it using this guide. Using the dummy I drafted up a pattern in some scrap lycra I had knocking about. It’s a raglan sleeve to reduce restriction on the shoulder and uses a swimsuit line on the legs for the same reason.
It hangs on the back of my workroom door so I can scare myself when I forget it’s not there.
The commissioner lives locally to me so I invited her over to test the fit and draw on all the patterns and seams with a chalk marker.
Any parts that were too large were taken in on the spot with a stapler. I now have something I know fits, and it’s time to start work on the final project!
Source: Dynasty Warriors 7
Worn to: Amecon 2012
I like sewing, so I made a costume with lots of sewing in it :P This was made to be worn for the Amecon Omake. I don’t even play Dynasty Warriors, it was just pretty.
Click my face to read how I made it!
Chiffon. It’s a light weight semi transparent fabric that if you’ve ever sewn, you’ll know the pain of 100 suns.
Here’s a fantastic tutorial by Eggie’s Red Dres which produces seams that look this good:
Click through to read more!
This is a really quick tutorial of how to sew on buttons in a way that’s both strong and neat. I’m experimenting with webcam tutorials, so if you want more videos please let me know. Only issue is that it has to be short and my camera isn’t very high quality. Any ideas please let me know and I’ll try to record myself doing it!
I was approached to make this commission by a lovely woman from France. It’s not often I get a chance to make big dresses even though I have the skills to make them, so this was a lovely change for me.
The costume uses 24 metres of triple velvet and the train is 9m long. (About the length of a double decker bus!). The corset is steel boned to give as much support as possible and to make it comfortable to wear. The train is actually part of the sleeves, so it can be removed and the wearer can move about more easily. Everything is lined for comfort and durability.
The wig is made from 2 punky XL wigs in a custom colour ordered from Coscraft, built over fosshape, so it’s worn like a hat.
All the jewellery was sculpted and cast in resin so it’s stronger than using Fimo.
Check out the Gallery for more pictures!

Now this is something I get asked about a lot- how do you bone your corsets? I use flat steel boning, which you can buy from Vena Cava. I use the 13mm stuff because it’s a easy measurement to make 15mm boning cases on my machine, and it’s heavy duty without being too hard to work with.
So first off, why steel boning? Well, most people don’t realise that with corsets it’s actually the fabric that does all the cinching in. The boning is there to push the fabric out so it doesn’t rumple and hurt you. The more boning and the stronger the boning the more comfortable a corset actually is. Steel boning is actually easier to use than you think, and works out just as cheap as many other alternative methods out there.
The issue with steel boning is that you have to finish the tips, otherwise it will just poke its way out of the corset over time. This tutorial will show you the method I use to make my tips safe, so without further ado, here are the materials you need!
You will need:
You will also need the corset you’ll be boning so you can take the measurements.
Whew- this tutorial is a mouth full!
I’m covering two hated things here- bias binding and it’s fancy little square corners. This is how to make something like this:
See it’s beautiful corners and the way it’s great on either side? Yeah, if you want to know how to do it, walk this way….
This tutorial is about how to make a lot of bias binding if you need it.
Bias binding is useful for many things, mainly edging. You can make it out of practically any woven fabric as long as it’s not too thick. I make most of my own bias binding because I like to colour match, and also because the satin used for the regular reels of the stuff tend to be really shiny and horrible.
What is bias binding? Bias is the diagonal on a woven piece of fabric. But cutting on the bias you can take a non stretch fabric and make it stretchy enough to be sewn around corners.
You will need:
I’ve made a tutorial! The first one is a nice easy one that I thought people would find interesting. It’s how to make a very large hair bow that stands up. I know my costumes don’t look like I make this sort of thing a lot, but it’s something I do often as part of commission work.
Let me know what you think of the gallery system! This is my first time testing this, I’d like to know what you think.
Here are some tutorial ideas that I’ll be doing next: