


Making a big costume is a BIG load of work. I don’t know about other people, but if I look at a costume and start thinking about how much work I have to do I start panicking. This means instead of doing work I’m panicking about how much work I have to do, which is helpful to no one.
The loki armour was a BIG thing. I’ve had real fights with sculpting and resin in the past, so if I let myself contemplate the mammoth that was sculpting and casting each piece I knew I was doomed.
So I learnt to trick myself.
I broke it down as much as possible. I started sculpting the easiest parts first, slowing working my way up to more difficult pieces. It was a process summed up a bit like this:

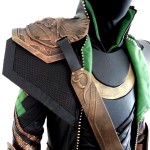
Here’s the next step in the armour making process- Straps!
First up templates- I used the foam pieces in the mock up to take the size needed, then scribbled a lot on paper while staring at references to get the right shape. These templates are for the strap that goes across the chest and also the strap for the back of the arm guards. The arm strap is mirrored on both sides so I only had to mould it once and can trim the other edge down.
Then I scanned them in and cleaned them up a lot in photoshop. Below is a template to help fellow costume makers- red means raised.

I use a biro pen to draw on the template over the top of some 2mm PVC foamboard. This creates an impression in the foamboard transferring the design. Each bit is carefully cut, carved and sanded.
I experimented with the technique for the raised dots- here’s what I found worked best-

Using a leather punch I punch a lot of holes in 1mm thick foamboard. I did ~10 at a time.

Using a knitting needle I poke the holes out of the punch.

I apply super glue to the main piece, working about 5 at a time, and tweezer on the dots.

Voila! Much more control that say using a glue gun or painting anything on. At this point you can just use the PVC foamboard as it- just get a heat gun and heat it into the correct shape, paint and you’re golden. But I wanted to make lots of copies so moulding time!

Here’s the final sculpts happily glued in their moulds. I used a bit of PVA glue on the chest strap piece to smooth it out after all the sanding the swirly bit went through.

I pour water into the mould until it covers the sculpts then pour it off to get an idea of the silicone volume.

The equipment! Not show is my rubber gloves and apron- v. important.

MIXING

I pain the silicone on to prevent airbubbles on the surface of the mould. RIP brush.

And top up with more silicone when the initial coat is done.

24 hours later I demold. This needs to be cleaned up a bit with a pair of scissors, but then it’s ready to take some resin.
Next up- Gauntlets!
Leave a Reply