


Pretty no? Here’s the breakdown of how the scales came to exist:

First I measured the pattern to see what size the leg sections of scales are and drew it out on a section of PVC foamboard. This one is an offcut from some blazblue boards we thrifted from expo a couple of years ago.

Using a knife I carve lines into it. At this point you could just stop, cut out all the little parallelograms, paint them and be on your way. But I hate myself and like spending money so I decided to cast them.

Get a bigger bit of foamboard and some strips. This is your mould base and the wall.

Hot glue your sheet of diamonds to the base then build it a house. Make sure it’s water tight. I test for watertightness by… pouring water in the mould. Then I pour the water into a measuring cup and it tells me the volume of silicone I’ll need to make the mould. GENIUS.
Make sure to dry your mould off thoroughly before continuing..

I’m using the tomps value condensation cure for this. Because silicone comes in ‘cheaper’ brands. Which is the equivalent of tesco value caviar.

Follow the damn instructions and pour your silicone in. Wear gloves, this mess be sticky. Pour in a thin line into a single place then spread it with your mixing stick. Shake the hell out of the mould once you’re done to pop the air bubbles.

Wait 24 hours then demould. You now have squares!
My commissioner asked for rigid squares but liquid latex would also work in this type of mould and give you more flexibility.
I’m using easy flo 120 resin for this.
I cut a bit of lining fabric the size of the mould:


All ready to go. Make sure your workstation is clear because you don’t want to tip things over by accident.

Mix in some black pigment and to the correct ratio. I did 20g:18g. Check out this action shot of my hand.

Arrrg so messy I hate resin. I use the wooden spatula to smooth it out. At this point I decide the diamonds on the edge can go to hell.

I smush the bit of fabric into the mould. This is to give the glue something textured to stick onto later.

About an hour later I pull this grey thing from the mould. Because I’ve lost the edges of the cast due to the fabric I then make a second one.

This is the two casts trimmed, dry brushed with silver and sprayed with a sealant. I then begin making the mould for the mirror images on the other leg.
To get the right flexibility I decide to cut all the squares up down the lines and glue them down to fabric. The best glue I found for the job is E600, and american glue you can get on ebay. It’s chemically horrible so wear a respirator, but it’s clear and flexible.
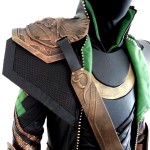
Here’s the final bits for the legs including a little bit for the tunic.
Next up, sewing the things into the trousers.
Pingback: » How to make a Loki costume part 7- Chest and wrist armour KhaosKostumes